Using the handy stencils in the kit that I have already laminated and cut out, I carefully pencil in the nose line. Then I thread a needle with the YLI hand quilting thread and follow the detailed instructions in the kit and stitch her nose. The lower I go, the more stuffing I pick up under the needle, to give it more dimension.
Once you have the nose finished, end the thread the same way you started - with a small anchor stitch and then come out away from the nose. Pull slightly on the start and end tails and carefully clip them off close to the head. The ends will snap back into the inside of the head if you make sure there is a bit of tightness when you pull on them before you clip.
Here she is all finished, thread tails clipped. One more check to shape of her head and body and then the paint gets mixed with water (recipe as to how much water is in the instructions) and we can paint.
I like to straighten up my space before painting, and put away the things that I don't want to get paint on. A nice piece of freezer paper will protect the table. Another nice thing to protect the table is the backing on the sheets of laminating plastic. I also get out the things I will need in advance, water cup, rags, tooth picks, etc. so I don't have to go hunting for them with a wet paint brush in my hand.
Oh yes, and let out that nosy cat, so there will be no whiskers in the paint. For some reason, she thinks she has to sit very close and watch me paint. I wonder if she thinks I can't do it all by myself.....
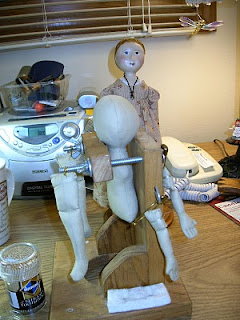
One important thing to consider before you start to paint is WHERE the parts will dry. Arrange this before you start painting, because I promise, it is not fun to try and find a spot while holding your wet paint item in your hands. I use a wigging clamp for these smaller dolls. The body fits into the top and the legs can go on the screw ends. There is a hook on the side for one arm. Now, what to do for that other arm????
Ah - spidy will hold it for me.....
I like to mix the paint wash in a container that I can save for a few days. Those cups that you get when you order your salad dressing on the side work wonders, or the salsa cups at Chipolte. Sometime you need an excuse to go out and eat or get fast food.....well, necessary doll making items is the best excuse I know of for going out to eat. Oh, the frosting cups in the Pilsbury refridgerated cinnamon rolls are awesome! The little metal caps make the best disposable paint pallets - there is a tiny little lip around the edge for water or turpintine. And the cup part makes good disposable water containers. (please recycle when you are finished with them).
So - here she is resting in her wigging clamp, looking a little like a dismembered halloween corpse for now. But soon she will get her face and hair.
While she dries, I will overdye her fabrics and make her wig.
Enjoy the day - and thanks for stopping by - Julie


What a Wonderful Post!
ReplyDelete