Privacy policy

I don’t collect any personal information. Please see google’s privacy policy regarding their cookies and information gathering.

My photo
Grand Rapids, Michigan, United States
Hello doll lovers! This blog was created to tell you about dolls I have made and classes I teach on doll making at Attic Window Quilt Shop in Comstock Park, Michigan (a suburb of Grand Rapids). My goal in teaching is to pass on the love of making heirloom quality dolls. Most of the dolls I make (and hold classes for) are designed by Gail Wilson - visit her website at www.gailwilsondesigns.com . Page down my blog for some fun doll links including antique doll sites and hard to find doll supplies.
Showing posts with label Cloth doll making. Show all posts

Tuesday, November 8, 2011

Are You Ready?

Are you ready for that time of year when you need to wrap up something special for that some one special?  It's too early to even think about it, but I don't want to find myself with so many unfinished dolls when I need them.  So TADA - announcing the week long doll bee at Attic Window Quilt Shop starting Nov 28 and going thru Dec 1, 2011. The times are 10:30 am on Monday, Wednesday and Thursday.  For Tuesday, we'll meet after the regular Tuesday Bee...say 1:00 pm.  The bee fee will be $5 for the entire marathon (4 days of classroom use). 
Hope to see you there!

Bring whatever doll you wish to finish during the week.  I hope to get several finished!  Including these MYO dolls that should have been finished and posted on Etsy many months ago.

On another note:  I have been looking for ways to "clean green".  I find I am allergic (or something like that) to many of the green cleaning products you find at the grocery stores.  I have been using Doctor Bronner's pepperment soap for many years and just found out that I could add some hydrogen peroxide to clean a spot on the carpet.  This spot has been a thorn in my side for many years!  Even the professional carpet cleaners couldn't get it....but good old Dr B and the hydrogen peroxide got it right out.  I used the food grade stuff diluted down to disinfect my counter top and had a bit left over, so I added the soap and used the rest on the carper.  Awesome stuff.  Here's the link that gave me the idea: http://www.using-hydrogen-peroxide.com/.  It's an enviromentaly safe cleaner that I plan on using a lot more.

While I am cleaning the kitchen, you go have some doll fun - so at least one of us has some fun today - Julie

PS - I found that the magic bullet glasses that I never use make a wonderfull shaker (use the lid with the larger holes) for my new green scour powder - borax. 

Wednesday, August 17, 2011

Finishing up the MYO doll with Hannah and Samantha

HI doll makers, today is the day we finish up the MYO dolls that Hannah and Samantha (and Mom helped too)  have been working on for awhile.   The first day (gee, was that last year??) they sculped hair on the doll heads. 

The second meeting, they painted the doll parts with skin and hair color and mom worked on the cloth parts.

The third meeting we painted on the facial details and shoes on the feet.  Ok, I helped a little by painting on the eye whites, but they did most of the face themselves. I was impressed they did so well as they are my youngest doll making pupils ever.
Yesterday I made the dresses and undies so that there wouldn't be naked dolls going home.   Samantha picked out a dark print dress with red dots.  It made up nicely with gathered sleeve edges and a wide lace ruffle.  Hannah picked out a sweet pink sprigged fabric that looked equally nice with the lace ruffle.  The undies were made out of an old man's hankerchief.  The slip was too long!  This is one of the dangers of making clothing ahead of time, no chance to fit it on the doll before hemming.  So, we'll have to fix that later. 

Today, H & S's mom finished sewing the torsos, and then....


Hannah attached one of the arms to the arm tube before we put the arms into the shoulders and sewed her legs to the thigh tubes. 
Hannah
Samantha
And Samantha stuffed some roving into her legs and sewed them shut.   Then we slipped the arm with arm tube into the holes in the shoulder and sewed on the second arm, added the legs to the torso and VOILA!  Two very nice Gail Wilson designed "Make Your Own" dolls completed by two very young doll makers.

The pantaloons went on first, then the slip, and finally the dresses.  I can see these two dolls are going to be well loved! 

Hannah and Samantha did a wonderful job on their dolls and can be very proud of themselves. 

For more information about the MYO doll from Gail Wilson, please see her website at

Monday, June 27, 2011

Painting eye whites

Julie's work table - almost cleaned up
Hi Doll makers!  Today I am straightening up the sewing table. My machine is in the shop for it's yearly cleaning and it's a good time to dust and clean the spot.  I'm finding all sorts of ufo's!

So as I go, I organize for what I'm going to do next while I wait for the sewing machine to return.  One thing I found is that several heads are suspended in their process waiting for eye whites to be painted on. I like to do my heads in alkyd oils and eye whites need to go on and dry before the rest of the face can be painted.  I like to give them a few days of drying time, so if I have to pull off some iris color, I can use my filbert with a touch of turp without pulling off any eye white. 
For me, the first step in painting is to find that spot where I can leave things to dry.  I have six heads to paint the eye whites (3 hitties for Thursday's doll class and 3 MYO dolls).  I happened to be dusting one of my spool pincushions and thought, hey - why not this for drying eye whites?
You can secure them if you slip a square of paper towel into the shoulder area loosely. Then the dowel will hold it in. Don't try to wad a big bunch of toweling, or the pressure of the paper against the dowel against the inside of the head might break the head. For the wooden Hitty head, use a tall spool of thread that fits the head dowel. They can move, just not so the movement spoils the painting of the eye white.


The doll heads may touch each other, so do not use to dry hair or even skin paint. 

And they touch the pincushion,  so make sure the hair is super dry before you load them onto the spool dowels.

Well, guess I better quit fooling around on the blog and get back to cleaning! 
Thanks for stopping by and have some doll fun today! - Julie

ps - I got the wooden spool pincushion from Gail Wilson at a retreat.


Visit the website above for her vintage pincushion kits. 

Wednesday, May 25, 2011

New York Doll - turning fingers


New York Doll designed by Gail Wilson, made by me years ago in an online class.
Hello doll makers!  Today I am working on finishing up the NY doll bodies and turning them outside right.  Tomorrow will be the second class at Attic Window Quilt Shop for Gail Wilson's version of the doll that graces the front cover on the book by Wendy Lavitt.  For more information about the doll, please click on the title of the link and it will take you to Gail's website.  The New York Doll is in the historical section.  I have one kit left over  from a prior class that I would like to sell - if anyone would like more info - please email me.  Yes, it comes with a set of pre-sewn hands.
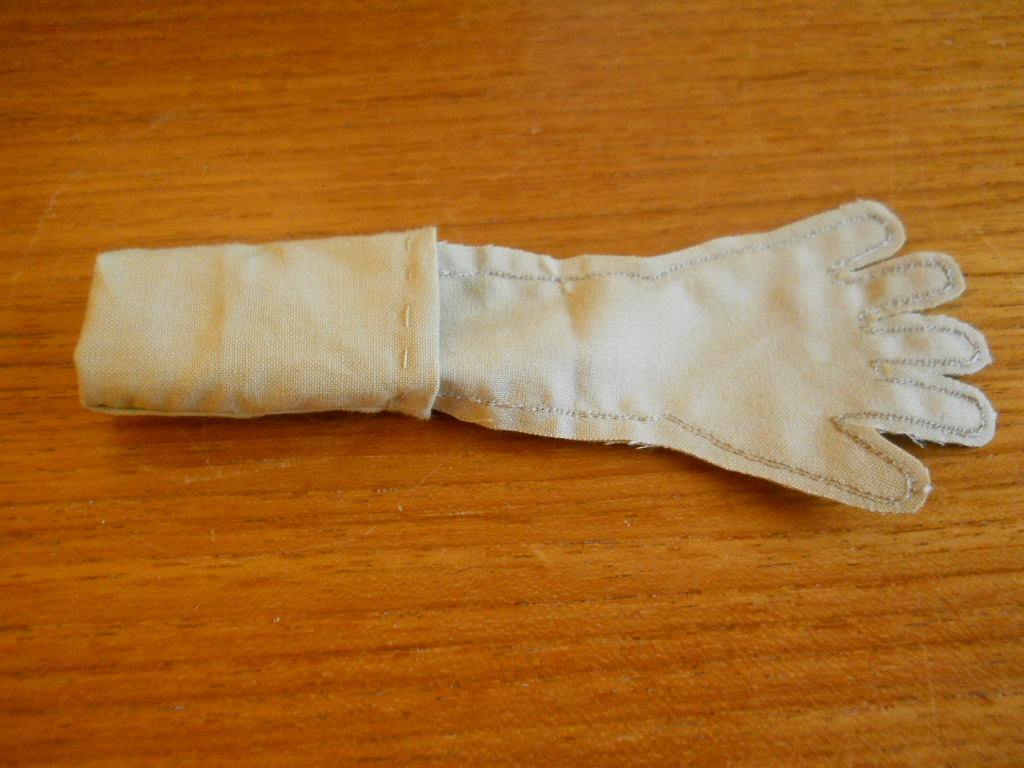
 I have found a short cut for the hands!  I scanned the hand pattern into my embroidery unit on my machine and I just let the machine sew the hands for me.  I also do this for all my students who ask for them.  I try and turn them outside right before I give them to the students as this is one of those tricky areas that takes a bit of practice.  Sorry about it being sideways!  I can't seem to find the way to turn it.


click on any picture for a closer look
Once the machine has sewn them, I start by doing a preliminary cut out that goes around the fingers as a whole. 


Then I clip between the fingers close to the stitching. This ensures that the hands will lay nicely after they are turned; no hitching up in the crux of the fingers.  Then I do another pass around with the scissors close to the stitiching, but not as close as the slips in the V's of the fingers.
  I  fray block the fingers, starting at the wrist, going around the fingers, and then ending at the other side of the wrist. You can do the fraycheck at any stage after you sew the fingers to just before turning.  I have done it both before and after the final pass of the scissors.  I have noticed that it is a bit easier to turn the fingers if they are not totally dry.  
Now comes the not so easy part: turning the fingers. This is where it really pays to have the tools. Years ago, I purchased tiny turning tubes on the recommendation of a fellow doll maker I met at a GW retreat, and boy I am so glad I did! They make turning tiny fingers a lot easier. If you don't have the brass turning tubes, you can also use the tube on a small paint brush and a tooth pick with a flat edge.   Any tube that will fit into the finger will work, even coffee stir straws.
brass turning tubes
tube from spotter brush
Finish the raw edge by turning over and basting.  How much to turn over will be in the instructions from Gail Wilson.
I like to turn up a cuff, to make it easier to hold the tube.   Slip the tube up inside one of the fingers or the thumb and then open the side seams and flatten them as flat as you can against the finger.  I have a video that shows how I turn the fingers, please excuse the background noise, I was listening to a movie at the time.   After you have the first tube in the finger, place the other tube or the flat end of a tooth pick on top of the finger over the fabric so it nestles in the first tube with the fabric between them. Think of a sandwich of inside tube, fabric, then flat toothpick.  Don't try to push the tooth pick down, but instead slip the fabric up over the toothpick. In the video it looks as if I am pushing down, but I am really mostly slipping the fabric up over the toothpick while holding the tubes against one another.  Hard to explain, but it works.  It's also important not to have too much of a seam allowance. 
The important thing is to take your time and to back up and start over if things are not moving along well.   


The pinky finger is the hardest because it is the smallest, so start with the thumb to get a feel for how it works.  Then move onto the smaller fingers. Also, if things are not going as well as you wanted, try getting just a tip of the finger turned and then try and pull it out the rest of the way after you have the others pulled. It only takes a bit of turned fabric for the hemostats to grab to be able to pull the rest outside right. Having said that,  BE CAREFUL not to put holes in your fingers unless you are going for that really antiqued/worn out look.   Holes in fingers are another accidently on purpose thing that happens in doll making. If it happens you can get a really sweet look by darning said hole and it makes the doll look well loved.

After they are turned, I like to use my hemostats as fingers and finger press the seams flat - not open, just flatten them out.

Here is my stash of doll body parts, ready for stuffing tomorrow.
Some of you probably noticed the open back seam in the body. Yup, I tweaked the pattern because I really like being able to stuff from a seam instead of from the bottom. To do this, make an extra body back pattern and cut in half down the center where the center back seam would be.  Then when drawing the pattern on the fabric add a seam allowance to the cut part (the center back seam).  Then sew the seam leaving a section of the back unsewn.  Press open the seams and voila, you now have your back piece with a center seam to stuff from. 
 If you want to, you can leave two areas in the center back seam open, one in the center top half where shoulder points are and one in the center bottom area, say where a tail bone would be.
Run a gather stitch around the butt section and pin to front bottom matching centers. Pin the important parts first: center head, sides of head, neck, center and side of bottom, waist, neck, shoulder points, and then some additional points halfway between what you already pinned. Easing where necessary, sew all around the body.   Where did I get this open area center back seam idea from?  Many of Gail's patterns use this technique - the cloth fashion doll for one.  I learn something new with every one of her patterns that I make.  This is why I like the try them all!    
  Have some doll fun today - Julie

Sunday, May 15, 2011

Upcoming classes

New York Doll - black version
Hi dollmakers!  What a good day for ducks!  It's raining and looks like an all-day rain: good for putting on a pot of soup (pea soup) and dollmaking.   I am finishing up my class list for the second half of the year newsletter at Attic Window Quilt Shop where I teach doll making.  The classes all start at 10 am, but we are ok with come when you can if you can't make the 10 am.  We usually go until 3pm or so. 

We are also aok with anyone who wants to jump in last minute - you just need to already have or get your doll pattern from Gail by phone or ipad when you jump in.  Once you have paid for your pattern, you are ok to participate in the class.  All you need for the first class besides your own pattern is your sewing machine with an open toe foot (or clear) and your basic sewing items.  The doll body fabric is available at the store. You will get a supplies list the first class for next time.  Here's a list of the classes:

GW New York Doll -  May 19 & 26 and June 3 & 16, 2011 at 10 am.   This is Gail Wilson's version of the antique doll that graces the front of Wendy Lavitt's book "American Folk Dolls" .
American Folk Dolls She is a 16" all cloth doll with an embroidered face and has a folk art cloth cat to hold.

At the June, July, and August bees (second Thursday of each month) we will reuse our kits and patterns for the "very smalls" - a collection of small table dolls including a snowman, angel, and Santa. 

Our adventure into making the 6 & 1/2"  GW Hitty begins June 23 and continues June 30, July 21, and 28.   The original Hitty lives at the Sturbridge Village Library in Massachusetts and has a world wide following.  There are links to various Hitty sites at the bottom of my blog. One of my favs is Esther Robertson's Hitty.     

 If you are looking for a wonderful series gift for a special little girl, this would certain be a good choice as she has many kitted (or finished) items for you to gift over a series of years.  She also has a book written about her that won a Newberry Medal back in 1929 called "Hitty - Her First One Hundred Years".  Rachel Field wrote the story imagining what Hitty's life would have been considering she believed the doll to be over 100 years old when she found her in an antique shop.  For the Hitty items, visit Gail's website by clicking on the post title above, or go to www.GailWilsonDesigns.com ,  and then click on Hitty on the side bar. Be prepared to ohh and ahh.

Starting August 4th, we will try our hand at Gail Wilson's Columbian doll. The original Columbian doll resides at the Wenham Museum in Boston.  She traveled the world raising money for Children's charities in the early part of the 1900's. You can follow her travels via her journal at the museum's website:    http://www.wenhammuseum.org/misscol.html

At the September bee, I will demonstrate how to carve an apple head doll.  The following Thursdays in October, we will carve an apple head, make an armature, and make clothing for the apple heads.  By December or so, the heads should be dried enough to put them together at the December bee. 
Whew!  So many dolls, so little time. I am glad for the rainy days to work on the class sample dolls.  oh -  First, I have to clean up my work table, it's so messy I can't find the table just yet.  And there is the pincushion doll in pink waiting for final items before she gets listed on Etsy. She is haggling with me over the bodice and the peplum. She says they don't match and she wants another matching set. Oh dear, and all those doll faces waiting for eye white.  Gee - I better get to work on all that! 

Thanks for visiting and have some doll fun today! - Julie

Saturday, March 19, 2011

Stash building and Fashion doll hat

Hello again, I just have to tell you about the hat I made for the fashion doll. This hat pattern is part of the Paper Mache doll instructions that I received when I participated in the PM fashion doll online class a few years back. The poor doll isn't finished yet, but I sure like making the hat! Here it is with the hat box from the cloth fashion doll instructions.
 The hat was fun to make and of course the color is a little wild, but I figured this was a practice hat and I will search for a color that matches the fashion doll's outfit.  This hat would be easy to turn into a pincushion too.  Thanks to Barb for the nice ribbon roses. I think that ribbon roses will be the next new thing I try to make myself.


Here's the hat box without the hat, so you can see how cute that is.  This skill - making and covering boxes will be something I try for bigger containers like a container to hold my scrap garbage on the sewing table as I work. We call it a thread heaven box.  Then at the end of the day, our workspace isn't a huge mess of threads and scraps all over the floor and table. 


OK, if I am to make some ribbon roses, I need some good ribbons!  Off to my favorite ribbon store - Peacock Alley in Ada, MI.   http://www.peacockalleyneedlepoint.com/Peacock_Alley_Needlepoint/Home.html
They have some awesome silk ribbons and are willing to special order for me. They also had some really unique gold thread that I was able to use for a necklace chain for my dolls.
And of course I found a few things that weren't ribbons to "speculate" with - especially after seeing a tutorial on how to make a flower gathering basket tutorial.

Here are some nice links to explore; things that I hope to try my hand at soon:
http://miniatures.about.com/od/miniatureprojects/ig/Beginners-Miniature-Projects/Make-a-Mini-Flower-Basket.htm

http://www.cynthiahoweminiatures.com/ribbonroses.htm
http://www.picturetrail.com/sfx/album/view/529627
Thanks to those talented ladies who are willing on post the tutorials for us newbies to try. It's SO MUCH FUN, and such a creative outlet to make dolls.  Have some doll fun today and thanks for visiting!

oh - one more thingie - I finished the outfit - all but the buttons and loops - so here is a picture of the outfit.  I plan on making her a purse and of course a parasol soon. 
The cloth fashion doll outfit.

Somebody likes the sunshine and all the bird activity. It sure is nice to have her over there at the window instead of in my face watching me. I think she must have been a doll maker in one of those other nine lives. She sure enjoys doll making (not as much as birdwatching though!)

Friday, March 18, 2011

Fashion doll continued

Hi Dollmakers - Happy Spring to you all.  It's a bit too early to start gardening, so to divert the urge to garden, I am working on my Gail Wilson designed fashion doll.  For kit information, please visit Gail's website at http://gailwilsondesigns.com/catalog/new_items.html    The cloth fashion doll is near the bottom 1/4th of the new items page.  

We were able to stuff the doll in the last class and for homework, the students were to gesso, apply the stencil, and then paint the skin color in oil paints.  Yes, the stencil shows up under the skin paint.  If you try to add the stencil after the skin paint, it won't adhere as well because the stencil needs a matte surface to adhere to.  Don't sand the gesso layer very much or you will loose the tooth to the gesso - just a tiny bit of sanding to smooth off the bumps. Think of panty hose on an unshaven leg - how the nubs of hair catch the panty hose. Then think again of freshly shaven legs, how smooth that would be for the panty hose to flow over when you pull them across the freshly shaven leg.  The goal of sanding gesso is just to take off the nubs, not to take off the layer of gesso. 

In the picture below, you can see the gesso layer is dry and I have trimmed my face stencil so there is not much extra vellum stencil paper around the facial details. This is so I can center it well and not fool my eye into thinking I have the face details centered when I really only have the vellum paper piece centered. It's sort of a built in method to get it right. I need those built in safe guards to help me because I am not a master doll maker!  Leave the extra at the top, so you have something to hold away from where the iron will be. Those clover irons can burn fast - I know this from painful experience!

After the mini clover iron is well warmed up, I verify that I have the side with the ink on the stencil against the face and using the measurements in the instructions, I place the stencil where it needs to be and iron on the face details.  Then I give that a bit of time to dry and maybe even spray a fixative over it. (depends on if it will be days before I get to paint or not).
I like to gather all my paint mixing items while the stencil is drying. I get the colors guide from Gail Wilson's Charlotte doll instructions. If you are new to oil painting doll faces, the Charlotte doll has some excellent guides to help you through your first oil painted doll face.  Gail also has some excellent tips and hints for painting in oils on her website.  Click on the title of this blog post and it will take you to her website. 

The paints I use are Griffin Alkyd oils, and the turp substitute I like best is Turpinoid in the blue and white label. Be sure you get the blue and white one, not the green label as the green label is brush cleaner and will do nasty things like take weeks and weeks to dry. You can find alkyd oils at art supply houses - here is my local one that has them on sale.  http://catalog.tsquareart.com/alkyd_colors-c-500_505.html?osCsid=3195f9d8212ce12497238de812f72adf    As to what colors you need and how to mix the colors - see Gail's hints - oil paint section for this info. 

The paint brushes I like best are 18/0 spotter for tiny lines, 20/0 filbert for an eraser (push paint around, not to apply paint with) and then for hair and other filling in, 10/0 round or liner for hair lines,  and 1/4 or 1/2 inch flat for painting skin color or other filling in like hair area.  I also gather the paint palette dishes (I love the frosting tops to the Pilsbury cinnamon rolls.  They wipe off easy when you are finished and have a tiny lip to hold turoinoid. You can use any brush you can achieve a thin line. I recommend you practice with water on paper, so you can get a tiny line. If you need to, you can thin out your paints with turp and cut down your paint brushes with scissors until you can get that thin line.  Plan b = if you still have trouble with getting the lines to your satisfaction, use the tiny filbert brush with just a tiny amount of turp on it to erase the area you are not happy with, or use the filbert to push the paint into the correct place.  Keep the eraser filbert clean, wiping the paint off the brush each time and cleaning it often.

Now we need to "divert" the kitty's attention, so there are no boo-boos while oil painting (like a tail into the palette).

I also place in a handy spot, my rags for swiping the brushes and my clean and dirty turp jars.  And it worked! The open window drew the kitty like catnip. She is anxiously awaiting spring too.

Green eye colors - looks grey on palette, green on doll eyes.

Now that I have all the necessary items gathered, it's time to start mixing colors!  I use the color mixing guide from the Charlotte doll (same recipes as on her website HINTS) and the colors get mixed on one palette and then the blob of color gets moved to a clean palette so there is no danger into getting the wrong colors on the brush and painted on the doll.  I paint in stages; skin color (let dry a few days), eye whites (let dry a few days) then I finish the face details,  (let dry a few days) and then do the shading.  I also like the wigging clamp for face painting. It holds the doll steady and you can lay it down flat on the table if you desire. Bear in mind that if you have wet hair on the back of the head, you need to be sure this doesn't touch the table surface.


Here's what you need for shading - just follow the instructions in Gail's Charlotte doll pattern.  
                                               This is the face just prior to shading.

After face details go on, I let that paint dry well and then I do the shading.  The reason you want to be sure everything is dry is so that the turpinoid won't take off or smudge your face details.  I usually don't have much time to spend in the doll room each day, so the time inbetween works out for me. If you are in a hurry to keep painting, you can speed up the drying time with cobalt dryer. I don't like to have this stuff because it is highly poisonous and I have small grand children around, so I don't want to risk having it since there is plenty of time between painting sessions for me.  Obviously you can also use non oil paints which dry very fast....but I don't get as good a face with these paints because the drying time is too fast for me. 
Here she is with shading around the face and nose finished. I still need to do around the mouth.  I get a bit better at it with more experience.  Doll making is like learning to make pie crust - it takes some doing it to get good at it. So your first dolls might not be as expertly created as the others are, but keep at it, you'll get there sooner or later. I find that developing those tricks to get it right really helped me over time. And every one has their own bag of tricks. 
 The last step will be to antique her with old village graining liquid in oil base, but this only after the shading is very dry - a couple of days should do it.

While all this dries, I need to pick out fabrics for her dress.  In our next class, our very talented doll maker Barb will show us how to make doll parasols - open and closed versions. She brought some last week and they are so cute!


Some fabrics I like for my fashion doll. I am leaning towards the peachy pink/brown print. The orange one underneath is a bit too orange for the ruffle, but I'll find something good - I have a nice stash of doll making fabrics. Thanks for visiting and have some doll fun today!

Friday, November 12, 2010

Finished Lottie

Here's Lottie!  After last post, she was just getting her nose sculpting done and a coat of half water, half skin paint.  We let her dry (thanks to NPR for the entertainment while we waited), finished her face embroidery and then moved onto hair. 

Following the easy instruction in the kit from Gail Wilson, we made her wig.  
See  http://www.gailwilsondesigns.com/catalog/new_items.html for kit or pattern details.

There is one scary part to making wigs from mohair....that is the thinning part.  I'm always afraid I'm going to take too much out and have bald spots.  But I have found that if you take some of the mohair you have left over, and lay it in under the hair in the too thin area, it hides the bald spot.  With a bit of experience, you get a feel for how much to take out.  


 Here she is in her handy wigging clamp. It's that extra set of hands that you need to hold the doll while you play with her hair. 


Side parts are fun too - but since Lottie will have braids, we'll go with the center part.  I'll center the seam on the wig with the center seam on the head and pin in a few spots.  Then gently lift off the pins and wig and put a spot of hot glue down under the hair with cool heat hot glue gun. Just a small amount so it won't show thru the top of the wig.  Then press down that part of the wig on the spot of glue and hold firmly for a second or two until the glue sets. Then work your way from the top of the head down the back with a couple more spots of glue, and pressing that part of the wig down matching seams. 

When you have worked from the top of the head to the nape of the neck, then go from the top of the head towards the forehead. If you hesitate to use glue, you can always hand tack with thread instead of using glue.  Once the wig is firmly attached, you can start styling the hair, thinning more as needed as you work towards the braid ends.  As you braid the second braid, remember to check the first braid, so you are making similar braids as to thickness, length and placement.  Tie off the ends with whatever you wish, remembering to keep the tie small, not a huge thick ribbon on this tiny braid end, or it will slip off.  If you are worried, you can always use a tiny drop of glue to hold it all in place.  I used embroidery floss here.

Lots of leftover mohair!  If there was a bald spot, this could be used for filling in under the hair attached to the wig.  Or use it to stuff a small project.

On all dolls with mohair wigs, I like to protect the hair before I put her clothing on.  Just snip off the corner of a plastic bag and snug it over the top of her head.  

Lottie's clothing is a simple dress with cinched sleeves. You run a gather stitch around the hemmed edge and then once the dress is on the doll, you pull up and tie off.


Using your hemostats, push the ends of the threads inside the dress. You could leave a nicely tied bow on the outside if you wish.

I have a stand already made for Lottie, but the dowels are a bit too long, so I snipped off half an inch on the bottom of the dowel with some nail snips. 

For the stand,  I used a round piece of wood and drilled holes for the dowels.  Then I sanded, stained and varnished the stand. The tops of the flat sanded and rounded top dowels hit right at her shoulder blades after the dowels are placed in the stand.  I dressed Lottie in her clothing of dress, pantaloons, slip, apron and bonnet, then I slipped the dowels up inside the pantaloons, past the waistbands of her slip and pantaloons until the tops are under the bodice of her dress.  I added invisible hair holders around the legs and dowels and slipped it up under her pantaloons so no one knows it's there. Then I slip the dowels into the stand. 

If the dowels are a bit loose, you can use a tiny amount of museum wax and put it on the dowel under the place where the dowels begin to show. Then slip them down into the hole on the stand. The wax will fill the space and the dowels will then be snug.  I don't like to glue the dowels into the stand, because I cannot change the dowels then.  For example, If Lottie ends up sold without her stand, I can reuse the stand for another doll that might be taller just by switching out the dowels. 

Here are a few more pictures of Lottie.  And thanks for visiting - have some doll fun today! Julie


Yeah, she was here the whole time, trying to take off with my mohair and being her usual pesky self.....I'd kick her out and shut the door, but she has figured out how to open the door! Drat


Gail Wilson dolls I have made

My Blog List