Privacy policy

I don’t collect any personal information. Please see google’s privacy policy regarding their cookies and information gathering.

My photo
Grand Rapids, Michigan, United States
Hello doll lovers! This blog was created to tell you about dolls I have made and classes I teach on doll making at Attic Window Quilt Shop in Comstock Park, Michigan (a suburb of Grand Rapids). My goal in teaching is to pass on the love of making heirloom quality dolls. Most of the dolls I make (and hold classes for) are designed by Gail Wilson - visit her website at www.gailwilsondesigns.com . Page down my blog for some fun doll links including antique doll sites and hard to find doll supplies.

Sunday, November 28, 2010

Creative Paperclay and wood

What am I up to?   This week I have been playing with creative paperclay on Gail Wilson's MYO dolls, working on Dixie Redmond's Izannah Walker Doll AND Gail Wilson's wooden Hitty.

They are all so much fun, I wish you could come over and play too.  I guess you'll just have to settle for looking at the links online.

Dixie Redmond's Izannah Walker class in an online class.  There are so many talented doll makers in this group as well as those who are new to dollmaking. The dolls that are coming from this class look like the real antique dolls.  Dixie sure came out with a nice pattern.
See details here:  (It's not too late to get into this class either, loads of us are just starting or are dreaming about starting).
I am almost ready to gesso on three Izannahs; just a few more limbs to stuff.

oh dear, I put the head on the wrong end on two


so many arms and legs!

Gail Wilson's online Hitty class details are here:
(page down to online classes info).  I have the body parts painted with one coat of skin color. This week I hope to finish the painting and move on to the carving part. Carving is a new skill to learn for me.  I have done several of Gail's Joel Ellis dolls, but most of that wood working was done with a dremel tool and a stationary belt sander. Oh and some elbow grease sanding too. The wooden Hitty will be my first venture into what I would call real carving.
MYO doll

Gail's MYO doll (Make your own doll parts) info about the molds, flumo, etc are here:
http://www.gailwilsondesigns.com/catalog/new_items.html
and  http://www.gailwilsondesigns.com/catalog/supplies.html   (page way down)

visit http://www.gailwilsondesigns.com/molded-dolls.html  for some more pictures of the inspiration, molds, and dolls from the MYO dolls series.
http://www.gailwilsondesigns.com/catalog/supplies.html


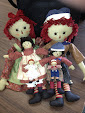
Paper clay added for hair

 The MYO dolls are available with the parts already molded, or you can purchase the molds and flumo and mold your own parts. This was an interesting and fun new thing for me in the doll making arena. I sure enjoyed making my own parts.  Flumo is one of those products that is very enjoyable to use. This doll is a basic doll with not much detail. You get to do the designing of the hair (paint, paperclay, wig, etc) and clothing. The body is a simple cloth one that is attached to the limbs by sewing thru sew holes. See the doll with the black molded hair, she has sew holes in her chest area.

I feel like one of Santa's elves in the Doll Division, working diligently towards Christmas eve.....will I get them all finished by then? 
 
Thanks for visiting, and I hope you give some of these dolls a whirl, they are loads of fun - Julie

Friday, November 12, 2010

Finished Lottie

Here's Lottie!  After last post, she was just getting her nose sculpting done and a coat of half water, half skin paint.  We let her dry (thanks to NPR for the entertainment while we waited), finished her face embroidery and then moved onto hair. 

Following the easy instruction in the kit from Gail Wilson, we made her wig.  
See  http://www.gailwilsondesigns.com/catalog/new_items.html for kit or pattern details.

There is one scary part to making wigs from mohair....that is the thinning part.  I'm always afraid I'm going to take too much out and have bald spots.  But I have found that if you take some of the mohair you have left over, and lay it in under the hair in the too thin area, it hides the bald spot.  With a bit of experience, you get a feel for how much to take out.  


 Here she is in her handy wigging clamp. It's that extra set of hands that you need to hold the doll while you play with her hair. 


Side parts are fun too - but since Lottie will have braids, we'll go with the center part.  I'll center the seam on the wig with the center seam on the head and pin in a few spots.  Then gently lift off the pins and wig and put a spot of hot glue down under the hair with cool heat hot glue gun. Just a small amount so it won't show thru the top of the wig.  Then press down that part of the wig on the spot of glue and hold firmly for a second or two until the glue sets. Then work your way from the top of the head down the back with a couple more spots of glue, and pressing that part of the wig down matching seams. 

When you have worked from the top of the head to the nape of the neck, then go from the top of the head towards the forehead. If you hesitate to use glue, you can always hand tack with thread instead of using glue.  Once the wig is firmly attached, you can start styling the hair, thinning more as needed as you work towards the braid ends.  As you braid the second braid, remember to check the first braid, so you are making similar braids as to thickness, length and placement.  Tie off the ends with whatever you wish, remembering to keep the tie small, not a huge thick ribbon on this tiny braid end, or it will slip off.  If you are worried, you can always use a tiny drop of glue to hold it all in place.  I used embroidery floss here.

Lots of leftover mohair!  If there was a bald spot, this could be used for filling in under the hair attached to the wig.  Or use it to stuff a small project.

On all dolls with mohair wigs, I like to protect the hair before I put her clothing on.  Just snip off the corner of a plastic bag and snug it over the top of her head.  

Lottie's clothing is a simple dress with cinched sleeves. You run a gather stitch around the hemmed edge and then once the dress is on the doll, you pull up and tie off.


Using your hemostats, push the ends of the threads inside the dress. You could leave a nicely tied bow on the outside if you wish.

I have a stand already made for Lottie, but the dowels are a bit too long, so I snipped off half an inch on the bottom of the dowel with some nail snips. 

For the stand,  I used a round piece of wood and drilled holes for the dowels.  Then I sanded, stained and varnished the stand. The tops of the flat sanded and rounded top dowels hit right at her shoulder blades after the dowels are placed in the stand.  I dressed Lottie in her clothing of dress, pantaloons, slip, apron and bonnet, then I slipped the dowels up inside the pantaloons, past the waistbands of her slip and pantaloons until the tops are under the bodice of her dress.  I added invisible hair holders around the legs and dowels and slipped it up under her pantaloons so no one knows it's there. Then I slip the dowels into the stand. 

If the dowels are a bit loose, you can use a tiny amount of museum wax and put it on the dowel under the place where the dowels begin to show. Then slip them down into the hole on the stand. The wax will fill the space and the dowels will then be snug.  I don't like to glue the dowels into the stand, because I cannot change the dowels then.  For example, If Lottie ends up sold without her stand, I can reuse the stand for another doll that might be taller just by switching out the dowels. 

Here are a few more pictures of Lottie.  And thanks for visiting - have some doll fun today! Julie


Yeah, she was here the whole time, trying to take off with my mohair and being her usual pesky self.....I'd kick her out and shut the door, but she has figured out how to open the door! Drat


Sunday, October 24, 2010

Papermini's free project

Hi doll fans,  I'm posting today just a quick note to tell you there is a fun and free paper mini project from Ann Vanture this month.  The free projects are available to those who are signed up for the newsletter. Each month you will receive a link to the free project. Be sure to check out the free items from prior months, too!  The boy doll below holds a pinwheel, one of the free projects awhile back.  This month there is Halloween candy and a bucket to hold it all.

To print the halloween candy, I used brochure paper for the candy cartons, and tracing paper for the tootsie roll suckers. You can use cardstock for the candy bucket, but I think I like the semi glossy brochure paper the best. Most of the projects will tell you which paper to use for the best results and I find the papers in the office area of my local Meijer grocery store. There are tutorials for some of the projects, so if you think it's too hard, check out how easy these projects are to make by looking at the tutorials. 

Some of the items are so cute, I just have to save them in a file so I can go back and print again. You know the story, one doll gets a nice book or sewing cards and shows them to the other dolls and then they all want one of their own.

If you would rather purchase completed items, that is an option too, or you can purchase CD's of past projects.

Take note American Girls fans!!!!! There are different scales to the free projects, one is just the right scale for American Girl dolls.

Click on the title of this post and it will take you to the Papermini's website for info on how to join: 
Sign-up for the free Paper Minis™ Club by emailing ann-vanture@paperminis.com. Club features monthly complimentary printable projects available in three scales: 1:12 (1" dollhouse), 1:6 (12" fashion doll) and 1:3 (18" girl doll). The club is a terrific introduction to the miniatures hobby. Everyone has access to the free on-library of photo tutorials!
Have fun and TRICK OR TREAT!

Friday, October 1, 2010

Lottie nose sculpt and paint wash

Hi Doll makers, today I am sculpting Lottie's nose and painting on her skin wash. Lottie is a doll designed by Gail Wilson. Click on the title of this post to view Gail's webpage. Lottie is available in kit or pattern in the new section.

First, I like to take a good look at my doll, making sure that she is nicely shaped. If she is a bit lop sided, I knead the area, using my hands as if I am playing with a lump of clay to push and mush and knead the head until it is the shape I want it to be. Check the dart line in her chin - is it centered? If so, you can use it as a reference point when using the stencil. If it is not centered, don't use it.

Using the handy stencils in the kit that I have already laminated and cut out, I carefully pencil in the nose line. Then I thread a needle with the YLI hand quilting thread and follow the detailed instructions in the kit and stitch her nose. The lower I go, the more stuffing I pick up under the needle, to give it more dimension.


Once you have the nose finished, end the thread the same way you started - with a small anchor stitch and then come out away from the nose.  Pull slightly on the start and end tails and carefully clip them off close to the head. The ends will snap back into the inside of the head if you make sure there is a bit of tightness when you pull on them before you clip.


Here she is all finished, thread tails clipped.  One more check to shape of her head and body and then the paint gets mixed with water (recipe as to how much water is in the instructions) and we can paint.

I like to straighten up my space before painting, and put away the things that I don't want to get paint on. A nice piece of freezer paper will protect the table. Another nice thing to protect the table  is the backing on the sheets of laminating plastic. I also get out the things I will need in advance, water cup, rags, tooth picks, etc. so I don't have to go hunting for them with a wet paint brush in my hand.

Oh yes, and let out that nosy cat, so there will be no whiskers in the paint. For some reason, she thinks she has to sit very close and watch me paint. I wonder if she thinks I can't do it all by myself.....


One important thing to consider before you start to paint is WHERE the parts will dry. Arrange this before you start painting, because I promise, it is not fun to try and find a spot while holding your wet paint item in your hands. I use a wigging clamp for these smaller dolls. The body fits into the top and the legs can go on the screw ends. There is a hook on the side for one arm. Now, what to do for that other arm????
 

Ah - spidy will hold it for me.....

I like to mix the paint wash in a container that I can save for a few days. Those cups that you get when you order your salad dressing on the side work wonders, or the salsa cups at Chipolte.  Sometime you need an excuse to go out and eat or get fast food.....well, necessary doll making items is the best excuse I know of for going out to eat.  Oh, the frosting cups in the Pilsbury refridgerated cinnamon rolls are awesome! The little metal caps make the best disposable paint pallets - there is a tiny little lip around the edge for water or turpintine. And the cup part makes good disposable water containers. (please recycle when you are finished with them).

Once you get your doll painted, do a final check to ensure you covered every skin space you want covered. In other words, no missed spots. This seems to be the # one thing that students in class forget to do and then they have to repaint right when they want to go on to the next step. Do the check. Do it after you have let it set a bit while you paint the rest of the body parts.  Roving is very absorbent and will suck in paint.  So paint the head, then all the limbs and then go back and check the head. Make sure you cover the backside of the head, where the hair will be, too. Even though she gets a wig, you don't want any unpainted area under the hair peaking thru.  AND I like to keep the leftover paint until I finish the head completely (needle work or facepainting). You never know, some thing might happen and you might need some additional skin paint. 
So - here she is resting in her wigging clamp, looking a little like a dismembered halloween corpse for now. But soon she will get her face and hair.
While she dries, I will overdye her fabrics and make her wig.


Enjoy the day - and thanks for stopping by - Julie


Thursday, September 30, 2010

cooking pumpkins

OK, I heard back from the flying husband about where the camera cord was.  He said to use batteries. So, to test how long the batteries work, here's a little post about cooking pumpkins!  I need better lighting for dolls, so tomorrow in the daylight, I will try again with the batteries for pictures of Lottie in process. Thanks for your patience!

I heard on the news that there is going to be a canned pumpkin shortage this holiday season. No sweat as far as I'm concerned because I always cook my own.  Once in awhile, I hear some one explaining to some one else how to cook pumpkin (peeling and dicing, then straining, and mashing) and I think to myself, geesh, the long hard way to skin that cat!  So here is my easy method to cooking a pumpkin.

I start by selecting a pie pumpkin that feels heavy for it's size....so lift a few, see how they feel.  Yes, you can consider this your arm muscle workout for the day as long as you lift at least ten pumpkins with each arm.  I usually get three medium sized ones because I like to do a lot of holiday baking with pumpkin.  The one I cooked tonight yielded about three cups.  Once you get them home, leave them out in the cool front porch until you are ready to bake them. 

 Once you are ready to bake, wash the dirt off and knock off the stem if it won't fit in your oven; the rack should be situated so the pumpkin is about mid level in the oven. I set my pumpkin on a metal plate to catch any drips (and there may be some) and to protect the bottom of the pumpkin from burning. Set the oven to 300 - 325 degrees - depends on how long you want to wait. If you're in a hurry, you can go 350 degrees, but you may get a bit of brown in the bottom of your pumpkin.  Bake until your pumpkin starts to look like a slightly deflated basket ball.  Usually for me this is about an hour and a half to two hours  for 300 degrees and a bit less for 325 -350degrees.  Tonight I baked my pumpkin with a meatloaf and scalloped potatoes in the oven with it. Then after dinner came out of the oven, I lowered the temp and let it go a little longer. It should feel like a baked sweet potato when it is finished baking....which is a tad bit softer than a regular baked potato.  You can see in the picture above where I poked my finger thru to see if it was soft.


Once you pull it out of the oven, let it cool a bit and peel pack some of the skin.  Then with a spoon, scoop off the soft pumpkin flesh off the top, being careful to avoid the seeds and strings.  Once you get a nice sized hole to the seeds, then scoop out those and put them in a large colander. I prefer the plastic ones because the have larger holes that allow the strings to fall thru into the garbage disposer. The mesh ones keep the strings in the colander, making it harder to clean the seeds. 
 

After the seeds are out, you can easily pull off some skin from a side and knock out a side and scoop out the pumpkin. No need to mash it, it's already very soft and ready for your recipe.  I measure out what I know I will need for certain recipes: pumpkin pie needs 1 1/2 cups, pumpkin bread gets 1 cup, etc.  Then I put those measured amounts into a container for the freezer for later or in the fridge for tomorrow, or right into the recipe bowl.

I run the colander under water in the sink and toss the seeds around a bit until all the bits of strings are gone. Let the seeds drain a bit, then spread single layer on a cookie sheet and bake in a slow oven at 225 until they are nice and crispy. If you have a convection option, use it.  Baking seeds takes hours, so test here and there until you are happy with the crunch.  Once they come out of the oven, I like a touch of butter and some salt.  If they are going to the birds, I just leave them alone.  If you are not wanting to deal with the seeds, the blue jays will take them any way they can get them, just toss them out the door in a spot that it's ok to do this -  in view of a window, so you can watch the birds taking the seeds.

And the finished goods - pumpkin cranberry bread and toasted pumpkin seeds -  yum yum:


Enjoy your pumpkin and no worries about a canned pumpkin shortage this year!

Wednesday, September 29, 2010

Lottie

Hi Doll makers, it's time to get ready for the next doll class - Gail Wilson's Lottie. Lottie was featured in the Austrailian magazine Homespun, and the pattern or kit is available on Gail's website. Just click on the title of the post and it will take you to Gail's website. Look in the new items for Lottie.  The class starts on Oct 7th at Attic Window Quilt Shop on Alpine at 6 Mile if you are interested.  See the last post for more details.

OK - I looked high and low for the camera cord, so that I could take pictures of Lottie, but the husband put it away....and who knows where. He's in an airplane right now, so I'll have to update the Lottie pictures later and for now, I will use pictures from another class. So sorry about this, I know you like to see the real doll in process so you know what it will look like in class.  Most of these pictures are from the Kate Greenaway class we had earlier in the year.

  First up  in making the class sample doll is to laminate the patterns and sew the body. Remember to use the tiny 18-22 stitches per inch. The reason this is important is so that the stitches won't pop when you stuff the doll.  Lots and lots of wool roving will go into the head. The first time I made a Gail doll, I remember thinking "no way is this much wool going into this little head". But yes, it is doable. You're going for a really hard head (like raw potato hard).  The body is not quite as hard (think baked potato hard). Tiny stitches will help keep the seams intact.

After sewing the body and limbs, use a stuffing fork to stuff the doll. Be careful not to push the fork thru the fabric, but if that happens, all is not lost. There are ways to mend boo-boos. And in the doll world, we just call those boo-boo's "instant antiquing".  Sometimes it's the things like mistakes that make a hand made doll so charming.

Roving is by far the best stuffing as it is resiliant and wants to expand outward.  Also, any doll fashioned after the dolls of years ago wants to be hefty. Wool roving adds that heavy feeling, and won't squish around like the synthetic stuffings.

Fingers are lightly stuffed and needle sculpted with YLI hand quilting thread. Elbows are added with seams centered.  Knees can also be added if you want your doll to sit.  If your dolls says she wants to stand, leave off the knee stitching.


This is a picture of the completed body from another doll similar to Lottie, except that Lottie doesn't have ears and neck darts.


Most dolls get a coat of gesso and skin paint. The parts pictured are from the Kate Greenaway series, hanging to dry after gesso. After the parts are all sewn and stuffed, Lottie's limbs will get an overdye wash  but not painted like these are. 
Overdye is a technique to make a new doll look like she has been hanging around for a hundred years.

Most of Lottie is stuffed, and hopefully on Friday morning, she will get her coat of overdye and will be hanging to dry.  She'll look weird until she gets her face, sort of like a faceless corpse.....

Sunday, September 12, 2010

Next Class - Gail Wilson's Lottie

Hi all,  Here's the skinny on the next doll class at Attic Window Quilt Shop:
The featured doll is Gail Wilson's Lottie (click on this post's title and it will take you to Gail's website - new items. Page down a bit to see Lottie).  The pattern is $18 and the class fee is $50.00. Lottie was featured in the Austrailian magazine HOMESPUN and is a cloth doll with a needle stitched face and a mohair wig. She is about 10" tall. 

Class starts Oct 7, and continues on Oct 21, 28, and Nov 4.  Class time is from 10am to 3pm - ish.  We usually break for lunch and run over to Subway to pick up a sandwich or pizza. Please bring your basic sewing items and sewing machine to the first class.   If you decide last minute you would like to take this class, it's ok to just show up, pay for class, and we can order your doll pattern then and there.  You won't have your pattern for the first class but can use the laminated class patterns.  All you need for the first class is your sewing machine and basic sewing supplies. I'll get you a tool kit made up  in time for the second class - you won't need it until the second class.

We are discussing what to do for the rest of the year on Thursdays - if we want to meet every Thursday or not, so if you have a preference - come and let us know so we can get your desires counted.  Also, if you would like to come and work on another doll, you may come to a doll class without signing up ahead of time and treat it as a bee ($5.00 daily bee fee applies).  If you need me to help you thru a process, please email me ahead of time and let me know what you need.

The first class in the new year will be Gail's cloth fashion doll - yup - the one folks ask me about all the time. She is a larger doll, more lady like in her shape, 12" tall and has a bonnet and fabric covered hatbox.


A word to the wise:  Christmas is coming!  Just about 100 days and it will be here!!!!

Saturday, August 28, 2010

What is she up to now?

Hi doll makers, you probably thought I dropped off the face of the earth since it's been awhile since I posted.  I have been enjoying summer: gardening, working around the yard, stuff like that.


I ran into the largest catapillar I have ever laid eyes on!  The picture is from:http://home-and-garden.webshots.com/photo/2908916340055811693SnOBeK .There were a crowd of them, and we eventually identified them as waxed sphinx catapillars.  Since they don't usually live in these parts, we suspect they hitch hiked on a hanging plant my daughter bought at the greenhouse.  They stripped all the leaves, then stopped eating.  After a few days, they disappeared. We wonder if they moved on or were some big bird's lunch.  Ah - so much nature, so little time.

What am I up to in the doll arena?  Not much. I hope to do more after September, by then the gardens should be winding down and the weather less conducive to playing outside. 

If you click on this post's title, it will take you to a Magic Miniatures tutorial on how to use flumo or other slip in molds. If you have been considering making your own doll parts from Flumo, this would walk you thru how to do it.  It's fun and I hope you give it a try.       

Friday, July 2, 2010

Just listed

I have finished the mulberry and teal Pincushion doll.  She turned out nice.  I was trying to decide if I should sell her or not and decided not to....then took her up into the sewing room to find a spot for her and realized  no room - she needs to find another home. So she is up for sale on Etsy.  Click on the title of this post if you'd like to go check out the Etsy listing.  Etsy sure is fun to look at. I can spend way too much time out there in Etsy cyber space!
If you would like to try your hand at making yourself a pincushion doll, the kits are available from http://www.gailwilsondesigns.com/   in the old fashioned dry goods section.  This is another site where I can spend time just surfing around. 
Enjoy the holiday weekend - Happy 4th of July to everyone - and have some doll fun while you have an extra day off.  Thanks for visiting - Julie


Saturday, June 19, 2010

Pincushion doll hat


oh - I just found the little note I had written to myself - "post some pics of PC doll hat". I'm getting to that age where I need to remind myself with little notes here and there or I forget things. So sorry these pictures are so tardy. Better late than never.....

For those of you new to this blog - this is Gail Wilson's Pincushion doll. You can click on the title of this blog to get to Gail's site and just page down a bit to get to the PC doll. Just before Memorial Day, I was asked to post some pictures of an easy to make doll hat that I made for this doll. The hat is actually part of another one of Gail's Doll patterns - The Kate Greenaway patterns. The hat is for the boy, but I fussied it up a bit for the PC doll.

Here are a few more pictures so you can see -
The stand with thread spools on dowels. These are the ones that came in the kit, but when I have a project going, I substitute the threads I need to use.
This doll has a few extra items on her - just so class participants can see the possibilities. The chatalaine is a jewelry making item - part of an earring making packet of items.
And here she is fully loaded - ready for work. She has the kit laces around her neck and even the instructions tucked inbetween the thread spool dowel and her shirt. All my doll making tools are in her apron. She is a hard working woman!

I have another in process in teal and mulberry colors- just about finished. I need to hand sew the bodice down around her waist and then finally decide if I want her on a wooden stand or not.  I probably will put her on her stand. I have one painted in a shocking yellow that I want to use graining liquid on. If I can pull it off and it looks nice - she will stand on wood.  If I flub it, she stands on her own.  Then I think she might go up for sale on Etsy.....I have one too many!

Thanks for your patience waiting for the hat photos. I did manage to finish the garden beds - the last one around the house got planted today. Now I just need to get a few more  on the lot across the street......before the really hot weather sets in.

Thanks for visiting and have some doll fun this week.

If you can - call your dad and wish him a Happy Fathers Day! - Julie

Gail Wilson dolls I have made

My Blog List