Privacy policy

I don’t collect any personal information. Please see google’s privacy policy regarding their cookies and information gathering.

My photo
Grand Rapids, Michigan, United States
Hello doll lovers! This blog was created to tell you about dolls I have made and classes I teach on doll making at Attic Window Quilt Shop in Comstock Park, Michigan (a suburb of Grand Rapids). My goal in teaching is to pass on the love of making heirloom quality dolls. Most of the dolls I make (and hold classes for) are designed by Gail Wilson - visit her website at www.gailwilsondesigns.com . Page down my blog for some fun doll links including antique doll sites and hard to find doll supplies.

Saturday, May 28, 2011

Cute Alert

Hot off the presses - or guess I should say, the sewing machine:  A carpet bag designed by Sarah C. of Two Sister's Fancy Goods for my yet unfinished Izannah Walker doll from Dixie Redmond's online class.  Here's a picture of the carpet bag I made this afternoon - it was FUN!


This was a practice version, to get the feel of how to make it. It is lined, has a pocket and real leather trim.  I wanted to get over the learning curve before I used real nice tapestry fabric and this is not bad for a first try.
 This would be a wonderful size purse for American Girl dolls, too.

   For info about the pattern for the doll's bag, visit Sarah's storefront: http://twosistersfancygoods.weebly.com/
Sarah also has a blog: http://www.cremnrabble.blogspot.com/ 


For info about Dixie's online Izannah class, please visit: http://www.izannahwalkerworkshop.blogspot.com/

The online class registration for 2011 is closed, but there is rumor there might be a 2012 class.

I had some doll fun today! Hope you got some too - Julie

Wednesday, May 25, 2011

New York Doll - turning fingers


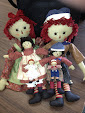
New York Doll designed by Gail Wilson, made by me years ago in an online class.
Hello doll makers!  Today I am working on finishing up the NY doll bodies and turning them outside right.  Tomorrow will be the second class at Attic Window Quilt Shop for Gail Wilson's version of the doll that graces the front cover on the book by Wendy Lavitt.  For more information about the doll, please click on the title of the link and it will take you to Gail's website.  The New York Doll is in the historical section.  I have one kit left over  from a prior class that I would like to sell - if anyone would like more info - please email me.  Yes, it comes with a set of pre-sewn hands.
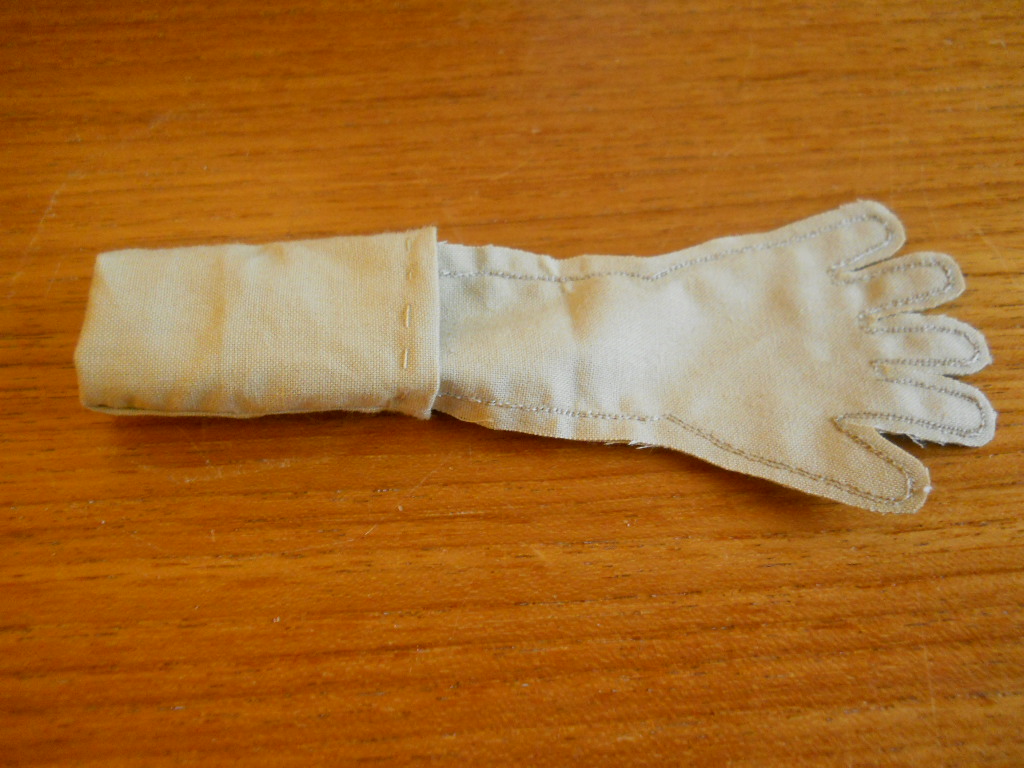
 I have found a short cut for the hands!  I scanned the hand pattern into my embroidery unit on my machine and I just let the machine sew the hands for me.  I also do this for all my students who ask for them.  I try and turn them outside right before I give them to the students as this is one of those tricky areas that takes a bit of practice.  Sorry about it being sideways!  I can't seem to find the way to turn it.


click on any picture for a closer look
Once the machine has sewn them, I start by doing a preliminary cut out that goes around the fingers as a whole. 


Then I clip between the fingers close to the stitching. This ensures that the hands will lay nicely after they are turned; no hitching up in the crux of the fingers.  Then I do another pass around with the scissors close to the stitiching, but not as close as the slips in the V's of the fingers.
  I  fray block the fingers, starting at the wrist, going around the fingers, and then ending at the other side of the wrist. You can do the fraycheck at any stage after you sew the fingers to just before turning.  I have done it both before and after the final pass of the scissors.  I have noticed that it is a bit easier to turn the fingers if they are not totally dry.  
Now comes the not so easy part: turning the fingers. This is where it really pays to have the tools. Years ago, I purchased tiny turning tubes on the recommendation of a fellow doll maker I met at a GW retreat, and boy I am so glad I did! They make turning tiny fingers a lot easier. If you don't have the brass turning tubes, you can also use the tube on a small paint brush and a tooth pick with a flat edge.   Any tube that will fit into the finger will work, even coffee stir straws.
brass turning tubes
tube from spotter brush
Finish the raw edge by turning over and basting.  How much to turn over will be in the instructions from Gail Wilson.
I like to turn up a cuff, to make it easier to hold the tube.   Slip the tube up inside one of the fingers or the thumb and then open the side seams and flatten them as flat as you can against the finger.  I have a video that shows how I turn the fingers, please excuse the background noise, I was listening to a movie at the time.   After you have the first tube in the finger, place the other tube or the flat end of a tooth pick on top of the finger over the fabric so it nestles in the first tube with the fabric between them. Think of a sandwich of inside tube, fabric, then flat toothpick.  Don't try to push the tooth pick down, but instead slip the fabric up over the toothpick. In the video it looks as if I am pushing down, but I am really mostly slipping the fabric up over the toothpick while holding the tubes against one another.  Hard to explain, but it works.  It's also important not to have too much of a seam allowance. 
The important thing is to take your time and to back up and start over if things are not moving along well.   


The pinky finger is the hardest because it is the smallest, so start with the thumb to get a feel for how it works.  Then move onto the smaller fingers. Also, if things are not going as well as you wanted, try getting just a tip of the finger turned and then try and pull it out the rest of the way after you have the others pulled. It only takes a bit of turned fabric for the hemostats to grab to be able to pull the rest outside right. Having said that,  BE CAREFUL not to put holes in your fingers unless you are going for that really antiqued/worn out look.   Holes in fingers are another accidently on purpose thing that happens in doll making. If it happens you can get a really sweet look by darning said hole and it makes the doll look well loved.

After they are turned, I like to use my hemostats as fingers and finger press the seams flat - not open, just flatten them out.

Here is my stash of doll body parts, ready for stuffing tomorrow.
Some of you probably noticed the open back seam in the body. Yup, I tweaked the pattern because I really like being able to stuff from a seam instead of from the bottom. To do this, make an extra body back pattern and cut in half down the center where the center back seam would be.  Then when drawing the pattern on the fabric add a seam allowance to the cut part (the center back seam).  Then sew the seam leaving a section of the back unsewn.  Press open the seams and voila, you now have your back piece with a center seam to stuff from. 
 If you want to, you can leave two areas in the center back seam open, one in the center top half where shoulder points are and one in the center bottom area, say where a tail bone would be.
Run a gather stitch around the butt section and pin to front bottom matching centers. Pin the important parts first: center head, sides of head, neck, center and side of bottom, waist, neck, shoulder points, and then some additional points halfway between what you already pinned. Easing where necessary, sew all around the body.   Where did I get this open area center back seam idea from?  Many of Gail's patterns use this technique - the cloth fashion doll for one.  I learn something new with every one of her patterns that I make.  This is why I like the try them all!    
  Have some doll fun today - Julie

Saturday, May 21, 2011

Accidently on Purpose

Gail Wilson's Pincushion doll with a few tweaks
You know how it goes, right?  You make the bodice a bit bigger because in the past you have issues with clothing being a tight fit (you stuffed a bit too much). Then come to find out, you should have just left it alone and it would have fit perfect.  Then you add some darts in the bottom to fit it better and then the top half is just a tad to big.  To fix that, you add a bust with some roving laying around on the crafting table (see, there is a reason for not putting it away so fast).  And you gather up the top of the lace and voila, you have tweaked your creation to stand out from all the others.  Accidently on purpose. 

While you are checking everything over,  you hear that little voice say "I'd like a belt please".  So you pull out your tiny buckles  -  a treasure you found while on errands.  This is why you always keep your eyes peeled; searching for good doll sized items because you never know when those little voices are going to pipe up. 

 While you are poking thru the doll treasures box, the little voice leans over and says,  "Hey, doing anything with those keys"?  So you add some keys and even a small pair of scissors to the mix.  She might need those scissors and keys when she finds her new home.


  Finding that just right shade of pink in felt can sometimes be an issue.  Sounds like a good excuse to visit my favorite fabric store. They have a very large stock of felt and wool felt in a wide range of colors. 


And a lady always needs a hat. Sometimes with braids, or flowers, or feathers and sometimes with them all!

To see the Etsy listing, just click on the title of this post or visit my Etsy Shop at: http://www.etsy.com/listing/50698732/the-pincushion-doll-with-tweaks?ref=ss_listing


For more information about purchasing a kit for this pincushion doll, please visit Gail Wilson's website at:http://www.gailwilsondesigns.com/catalog/oldfashdrygoods.html

Thanks for visiting  - Julie

Sunday, May 15, 2011

Upcoming classes

New York Doll - black version
Hi dollmakers!  What a good day for ducks!  It's raining and looks like an all-day rain: good for putting on a pot of soup (pea soup) and dollmaking.   I am finishing up my class list for the second half of the year newsletter at Attic Window Quilt Shop where I teach doll making.  The classes all start at 10 am, but we are ok with come when you can if you can't make the 10 am.  We usually go until 3pm or so. 

We are also aok with anyone who wants to jump in last minute - you just need to already have or get your doll pattern from Gail by phone or ipad when you jump in.  Once you have paid for your pattern, you are ok to participate in the class.  All you need for the first class besides your own pattern is your sewing machine with an open toe foot (or clear) and your basic sewing items.  The doll body fabric is available at the store. You will get a supplies list the first class for next time.  Here's a list of the classes:

GW New York Doll -  May 19 & 26 and June 3 & 16, 2011 at 10 am.   This is Gail Wilson's version of the antique doll that graces the front of Wendy Lavitt's book "American Folk Dolls" .
American Folk Dolls She is a 16" all cloth doll with an embroidered face and has a folk art cloth cat to hold.

At the June, July, and August bees (second Thursday of each month) we will reuse our kits and patterns for the "very smalls" - a collection of small table dolls including a snowman, angel, and Santa. 

Our adventure into making the 6 & 1/2"  GW Hitty begins June 23 and continues June 30, July 21, and 28.   The original Hitty lives at the Sturbridge Village Library in Massachusetts and has a world wide following.  There are links to various Hitty sites at the bottom of my blog. One of my favs is Esther Robertson's Hitty.     

 If you are looking for a wonderful series gift for a special little girl, this would certain be a good choice as she has many kitted (or finished) items for you to gift over a series of years.  She also has a book written about her that won a Newberry Medal back in 1929 called "Hitty - Her First One Hundred Years".  Rachel Field wrote the story imagining what Hitty's life would have been considering she believed the doll to be over 100 years old when she found her in an antique shop.  For the Hitty items, visit Gail's website by clicking on the post title above, or go to www.GailWilsonDesigns.com ,  and then click on Hitty on the side bar. Be prepared to ohh and ahh.

Starting August 4th, we will try our hand at Gail Wilson's Columbian doll. The original Columbian doll resides at the Wenham Museum in Boston.  She traveled the world raising money for Children's charities in the early part of the 1900's. You can follow her travels via her journal at the museum's website:    http://www.wenhammuseum.org/misscol.html

At the September bee, I will demonstrate how to carve an apple head doll.  The following Thursdays in October, we will carve an apple head, make an armature, and make clothing for the apple heads.  By December or so, the heads should be dried enough to put them together at the December bee. 
Whew!  So many dolls, so little time. I am glad for the rainy days to work on the class sample dolls.  oh -  First, I have to clean up my work table, it's so messy I can't find the table just yet.  And there is the pincushion doll in pink waiting for final items before she gets listed on Etsy. She is haggling with me over the bodice and the peplum. She says they don't match and she wants another matching set. Oh dear, and all those doll faces waiting for eye white.  Gee - I better get to work on all that! 

Thanks for visiting and have some doll fun today! - Julie

Gail Wilson dolls I have made

My Blog List