Hi doll makers - I just wanted to take a minute and say how nice it is to talk to some of you when you call me while I am at Attic Window Quilt Shop. Thanks for the nice compliments on my blog and I am always happy to answer any questions that I can regarding the dolls that I make.
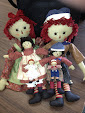
I seem to be getting lots of questions about the Pincushion Doll, so I thought I would post the answers, in case others are wondering.
The pincushion doll kit is available from Gail Wilson - the designer of the doll. The kits are wonderful with detailed instructions. The kit comes complete with all the things you need to make the doll including a silk screened torso/face/hair that you embroider. You cut the back out, pin it carefully to the front, and then sew before you cut out the front. It's very easy with all the nice instructions to walk you thru the doll making process.
If you think you may want to make more than one, get an extra silk screened torso, available separately. The kits come with or without fabric for the skirt. The skirt is stuffed and becomes the pincushion. There is an apron appliqued onto the front that has a pocket to hold your sewing tools. The REALLY NICE thing about this pincushion is that when you use it, your items don't get lost or buried under all your stuff on the work table. No more losing your scissors, or ruler inside your project. OK, I admit it, yes, I have done stupid stuff like that. I even sewed my shirt to the iron board ONCE. Now fess up - you have done things like that too....right?
The hat that my PC doll wore in class yesterday is not part of the PC kit or pattern, but is part of Gail's Kate Greenaway boy and girl patterns. It's the boy's hat, but I snazzy it up a bit for the ladies. It is very easy to make and has loads of WOW even though it is very easy. It would be a good first project for those who are new to doll hats. The process, once done, can be used to make hats of all sizes - just find a thing around the house that is the right size. (light bulb, plastic Easter egg, things like that).
The KG patterns are in the historical dolls section of Gail's website. I just make the boy's hat and then add some ribbon, flowers, or braided cord around the where the crown meets the brim and voila, a nice ladies hat.
I would recommend that you get roving with the kit - it is the best stuffing for the torso. It's hard to stuff well if you use the slick kind of stuffing that is available at all the craft stores. Gail's roving is the nicest that I have seen and if you want to use a more economical version of stuffing, use it in the lower skirt portion saving the roving for the upper hips and torso and arms. Gail's non roving stuffings are excellent too.
You'll want to have a large stuffing fork for the skirt area and a smaller stuffing fork for the torso and arms. Hemostats are also a nice doll making tool and I have found they sure are handy for all sewing! I now have several pairs - one by my machine, one in my take it basket, and several around the house.
My pincushion doll is the "work horse" of my sewing table. I hear the other ladies in the group say the same thing. Everyone has their favorite tools they keep in the pocket of the apron and we all have multiple versions of this doll for the sewing stations (you know, one on the sewing table, one near the couch in the living room so you can sew while you watch TV, etc).
Several of the ladies in the class are making second dolls that do not stand on the wooden stand (also available from Gail separately), but just sit on their bottom. I like the stand, I use the spool dowels to hold the thread for my project, so usually, all that I need is on the doll. She has my current doll kit parts either pinned to her skirt, or in her pocket. The lace and cords are usually drapped around her neck. The paint pots fit inbetween her skirt and the spool dowels, so I am all set - no more losing my kit parts.
So - I hope I have answered all the things you were curious about. If not, please add a comment and ask - I'd be happy to show and tell. Thanks for visiting and have some doll fun today!