Privacy policy

I don’t collect any personal information. Please see google’s privacy policy regarding their cookies and information gathering.

My photo
Grand Rapids, Michigan, United States
Hello doll lovers! This blog was created to tell you about dolls I have made and classes I teach on doll making at Attic Window Quilt Shop in Comstock Park, Michigan (a suburb of Grand Rapids). My goal in teaching is to pass on the love of making heirloom quality dolls. Most of the dolls I make (and hold classes for) are designed by Gail Wilson - visit her website at www.gailwilsondesigns.com . Page down my blog for some fun doll links including antique doll sites and hard to find doll supplies.

Thursday, January 28, 2010

Time for some paper fun!

Every once in awhile, I run into some thing fun that I like to share with others - here's one from the Toymaker:

http://www.thetoymaker.com/Toypages/61EndlessCard/61InfinityCard.html

Thanks Marilyn!

Wednesday, January 13, 2010

Bias tape

Hi every one, every once in awhile, out there in cyber space, I run into a neat little trick worth sharing.  This one is for making your own bias tape DIY (without any handy gadget).  While I own and love my bias tape maker, every once in a while I need bias tape and the maker isn't handy. This method would work anywhere you can pin a long needle down and for any size bias tape.  I hope you enjoy it and thanks to that creative little Daisy for thinking of it! 

http://creativelittledaisy.typepad.com/creative_little_daisy/2007/11/diy-version-of.html

Saturday, January 9, 2010

Needlework doll wig

Say, it's much easier to work on a wig without a furry little kitty wanting in on all the fun. Since Meeko has moved back in with my daughter, it's much quieter in the sewing room.  Using the instructions in the pattern I made her wig from a nice brown color mohair.  The Pincushion doll has voluntered to hang onto it until the needlework doll is ready for it.  I like to put the wig on last, so the dressing of the doll doesn't make it messy. 


Here's the pincushion doll, with the wig just sitting ontop of her head - no styling of course.  With the needlework doll, there will be a snood that the hair just gets snugged up into.
Now that the antiquing on the doll body has completey dried, it's time to sew her body together and dress her up. I put her in the wigging clamp to take a picture and thought I would slip her wig on, just so you could see her in her "altogether" state. 

My sister once saw the wigging clamp on my working table and wanted to know "what's that, a doll tourture device?"

 
And finally, she is finished and ready to be delivered.  She is fun to make with her little strawberry emery and needlecase.  The snood was made with netting, but I think I will try my hand at the crochet snood instructions that are provided in the pattern. Wish me luck!  And have some doll fun today.

Would you like to try your hand at making a needlework doll? Kit or pattern information is available at:
http://www.gailwilsondesigns.com/    in the new items section.


Thursday, January 7, 2010

Needlework Doll face


Hi every one, today is a snowy day - a great reason to stay in and make dolls. I'll continue with making the sample doll for the next class I'll be teaching at Attic Window Quilt Shop; Gail Wilson's Needlework doll. For more information about the pattern and kit for this doll, please vistit Gail's website and scroll down to the needlework doll - she is right under the pincushion doll.  
http://www.gailwilsondesigns.com/catalog/new_items.html

So far, I have sewn the body parts, stuffed them, painted on the skin color, stockings and shoes and have applied the face details with colored pencils. There are special instructions in the pattern/kit for how to make the pencils look like paint. Colored pencils are so easy to create a doll face with, so if face painting is holding you back from trying your hand at doll making, try either this doll or Gail's feedsack dolls. Pencil faces are super quick too.  I must remark on how this doll was very easy to sew and stuff.

Here she is waiting for the fixative to dry before the sealer gets applied.


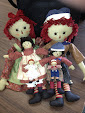
The pencil faces look just as nice as the painted ones do - here is a comparison. The doll on the left has painted (also antiqued, so a bit darker) and the doll on the right is in pencil before antiquing. That poor small Columbian doll on the left is still waiting for clothing.....it's been several years.


While things dry, I work on the clothing. Here is her apron, pocket and emery strawberry  finished and hanging out on the pincushion doll until the doll us finished.

Now, on to the wig.  Have some doll fun today - Julie

Saturday, January 2, 2010

Needlework Doll


Today I started making the sample doll for the next class: Gail Wilson's Needlework doll. She is a 10" cloth doll with a mohair wig and netting or crochet snood. Her face is easily accomplished with colored pencils. The pattern for this doll is $18.00 and you can get your clothing materials at Attic Window the day of the class. You can view more information about this doll on Gail's Website in the New Items section. Click on the title above and it will take you to Gail's site and then page down to the needlework doll.

If you are interested in the class, please sign up by Jan 10th and let me know on the sign up sheet if you need me to get you a pattern and mohair or the full kit that is available for $42.

The dates of the classes are Jan 21 & 28 and Feb 4 & 18.

Emma and Charlotte will be offered Feb 25th, March 4, 18 & 25. Emma is an oil painted doll and Charlotte is her black companion, also painted with oils. We use Alkyd oils, which dry overnight. Please visit the link below for more information about Emma and Charlotte.


http://www.gailwilsondesigns.com/all_page_content/historic_primitive2_ins.html

Gail Wilson dolls I have made

My Blog List